Friday, February 8, 2019

Transparent Bubble Photoshop Tutorial Photo Effects For Beginners Step By Step


Howdy! Today we will make Transparent Bubble Photoshop Tutorial Photo Effects For Beginners Step By Step.
Mostly you watch the water bubbles on a wallpapers, do you think how these can be create in Photoshop.
No! Then don’t be worry, I have found a way to create bubbles effect in Photoshop. I have done brain storming to make the bubbles effect on a wallpaper. Good thing is that I have created this effect many times successfully which I’m going to share with you. In this tutorial I will use a flowers wallpaper and will make bubbles effect on it.
So be attentive and read out this tutorial complete. If you wouldn’t understand this tutorial then watch the video.


Image after Bubble Effect

Transparent Bubble Photoshop Tutorial Photo Effects For Beginners Step By Step   

Step 1: Open Flowers Wallpapers in Photoshop Window

In our first step, Pick up the flowers wallpaper from computer and open it in Photoshop Window.
For this purpose go to File -> Open from main menu or press the command Ctrl + O.
The new Open window will expose, here select the flowers image from computer and do click on open button.

Step 2: Make Duplicate Layer and Drop Ellipse Shape

When you will click on open button suddenly your selected picture will open in Photoshop window. Now make the duplicate layer of the Background. So press the command Ctrl + Alt + J or go to Layer -> Duplicate Layer and enter the name of layer as “Copy”.

After that select the Ellipse Tool from Tool Bar and set the Fill #ffffff and Stroke No Color. Now drop the circle on the flowers wallpaper for making Bubbles.

Step 3: Set Bevel & Emboss Layer Style Properties

In our 3rd step set the Bevel & Emboss Layer Style properties. So go to Layer -> Layer Style -> Blending Option from main menu.
A Layer Style window will open, here click on Bevel & Emboss option and set properties as
Style: Inner Bevel
Technique: Smooth
Depth: 140%
Direction: UP
Size: 11px
Soften: 0px
Angle: 90˚
Altitude: 60˚
Highlight Mode: Linear Light White
Opacity: 100%
Shadow Mode: Linear Light Black
Opacity: 41%

Step 4: Set Inner Shadow Layer Style Properties

After Bevel & Emboss now manage the Inner Shadow properties.
Select the Inner Shadow option from Layer Style window and Set Properties as
Blend Mode: Overlay White
Opacity: 40%
Angle: -90˚
Distance: 5px
Choke: 0%
Size: 8px


Step 5: Step Inner Glow Layer Style Properties

After setting of Inner Shadow properties, now settle down the Inner Glow Properties.
So select the Inner Glow option from Layer Style window at Left side and set values as
Blend Mode: Darken
Opacity: 75%
Noise: 0%
Color: #4e4e4e
Technique: Softer
Source: Edge
Choke: 0%
Size: 10px
Range: 50%
Jitter: 0%
Step 6: Set Satin Layer Style Properties
Now select the Satin option from Left Side of the Layer Style Window and manage the Satin properties as
Blend Mode: Vivid Light White
Angle: 19˚
Distance: 20px
Size: 30px
Contour: Invert

Step 7: Set Drop Shadow Layer Style Properties

At the end select the Drop Shadow option and manage its properties as
Blend Mode: Multiple Black
Opacity: 70%
Angle: 90˚
Distance: 4px
Spread: 18%
Size: 8px


Finally we have set all properties of layer Style for Bubble effect. You will see a water bubble has been created after setting of these above properties. Now make more Bubbles on the Flowers wallpaper.
Don’t set again these properties because this is time consuming. For your easiness make the duplicate layers of the Ellipse 1 layer.

Step 8: Make Duplicate Layer of Ellipse

The first bubble is ready, now make the duplicate layer of Ellipse for more bubble. For this purpose go to Layer -> Duplicate Layer and enter the name of the every layer at your wishes.
After making the Duplicate Layers, move these at proper place on Flower wallpaper.
In below picture I have made more bubbles after duplication and manage their size by Transform Control.

Finally we have made bubbles effect on a photo just using Photoshop. I hope you will understand it and will do practice at your end.
If you couldn’t understand this amazing tutorial then don’t be worry. Here I have made a live video of this tutorial watch it and clear your concepts.
Transparent Bubble Photoshop Tutorial Photo Effects For Beginners Step By Step

Ultimate Results
Conclusion  
After discussion of above tutorial I conclude that it is so easy to make bubbles effect on a picture in Photoshop.
First all opened a flowers image in Photoshop window and made the duplicate layer.
After that Set the Bevel & Emboss, Inner Shadow, Inner Glow, Satin and Drop Shadow Properties. At the end made more duplicate layers and adjusted at proper places on image.
This was all procedure to complete the bubbles effect. I hope you enjoyed it and will do practice at your end.

Incoming Searches


photoshop bubble effect


photoshop bubble text effect
photoshop water bubble effect
adobe photoshop bubble effect
bubble effect photoshop download
bubble effect photoshop brush
bubble effect brush for photoshop
bubblegum effect photoshop
bubble effect in photoshop
water bubble effect in photoshop
create bubble effect in photoshop
soap bubble effect in photoshop
bubble light effect photoshop
make bubble effect photoshop
soap bubble effect photoshop
transparent bubble effect photoshop
bubble wrap effect photoshop


 See Also


Share:

Photoshop Tutorial How to Make Water Reflection for Beginners Step by Step


Howdy! we will learn Photoshop Tutorial How to Make Water Reflection for Beginners Step by Step.
People think that they can’t make this effect, here I will only say “It is not difficult work” I have made it many times. So that’s why I’m going to share this knowledge with you.
I will take a mountain picture and will make the reflection of mountains in the river water. The all procedure is so simple, every can understand it without extra effort.  
So be attentive all details have been written in below step. Read the tutorial complete and do practice work with me.


Image after Water Reflection
Photoshop Tutorial How to Make Water Reflection for Beginners Step by Step

Step 1: Open Mountain Image from Computer

In our first step open a mountain image from computer. For this purpose you go to File -> Open from main menu or press the command Ctrl + O.
Suddenly you will see a new open window will open. Here select your require image from computer but I have selected a mountain picture for water reflection effect.

Step 2: Make Duplicate Layer of Background

  In second step make the duplicate layer of the Background in Layer Panel.
For this step go to Layer -> Duplicate Layer or press the command Ctrl + Alt + J. Enter the name of layer as “Duplicate”.
In below picture I have made a duplicate layer let’s see.

Step 3: Cut off the Mountain Area by Quick Selection Tool

In 3rd step make the selection of the mountain area and cut it off individual layer.
For this purpose pick up the Quick Selection Tool from Tool Bar. After that drag the tool on the area which you want to elect. You will see a + sign will appear in the tool which indicate that you can select more and more area. If you want to deselect area than hold the command Alt, the - sign will appear in the tool which indicate that you can remove selected area.

After selection of the mountain area now press the command Ctrl + J. The selected portion will be separated in new layer, so change the name as “Cut”.


Step 4: Flip Vertical the Cut Layer

Now in 4th step flip the Cut Layer in Vertical position. For this purpose go to Edit -> Transform -> Flip Vertical.
The Cut layer image will look vertical like below picture. Now adjust this layer at proper position.

Step 5: Make Texturize Canvas for Cut Layer

After making Flip Vertical, now make the Cut layer in Canvas effect.
For this determination go to Filter -> Filter Gallery or press the command Ctrl + Alt + F. A filter gallery window will open, here go to Texturizer and put the properties as 
Texture Canvas, Scaling 200%, Relief 3 and click on Ok button.

Step 6: Reduce the Opacity of Cut Layer

At the end reduce the Opacity value of the Cut layer. For this purpose go to Layer -> layer Style -> Blending Option. Reduce the Opacity 30 % from the Bevel & Emboss option.

You will see the Flip Vertical mountain image is looking like a water reflection effect on the river.
This was our final step I hope you will understand it and will do practical work at your end.
If you couldn’t understand this tutorial than don’t be worry watch the video.

Photoshop Tutorial How to Make Water Reflection for Beginners Step by Step

Ultimate Results
Conclusion  
At the end I conclude that’s we can make water reflection effect in Photoshop.
We have followed 6th to complete this all procedure. First opened a mountain image from computer. Made the Copy and Duplicate layer, cut off the mountain area and gave texturizer. At the end reduce the Opacity of the duplicate layer.
I hope you enjoyed it and will do practice at your end.

Incoming Searches


Make Water Reflection
make water reflection photoshop
make water reflection illustrator
make water reflection effect
how make water reflection
how to make water reflection in painting
how to make water reflection in after effects
how to make water reflection effect in photoshop
how to make water reflection on wall
how to make water reflection in ps
how to make water reflection art
best way to make water reflection in photoshop
water reflection makeup
make a water reflection in photoshop
how to make water reflection in photoshop cs6
how to make a water reflection effect in photoshop cs6
how to make water reflection in photoshop
how to make water reflection in illustrator
make water reflection in photoshop
how to make realistic water reflection in photoshop
how to make water reflection on photoshop
how to make water reflection
how to make water reflection photoshop
photoshop tutorial how to make water reflection
how to make a water reflection effect in photoshop
how to make water mirror effect in photoshop
how to make a water reflection in photoshop
how to make a water reflection in illustrator
how to make a water reflection
how to make a reflection in water
how to make moon reflection on water
how to make a reflection on water
how to create water reflection effect in photoshop
how to create a water reflection effect in photoshop
how to create realistic water reflection effect in photoshop

See Also


Share:

Wednesday, February 6, 2019

Custom Shape Photoshop Snowflake Tutorial for Beginners Step By Step


Howdy! Today we will learn Custom Shape Photoshop Snowflake Tutorial for Beginners Step By Step.
It you want to edit your photo in snowflakes border than this tutorial is fit for you. We will use snowflakes vectors technique to complete our work. So readout this tutorial complete and do practice at your end.
If you wouldn’t understand this tutorial than don’t be worry watch the video to clear your concepts.

Original image

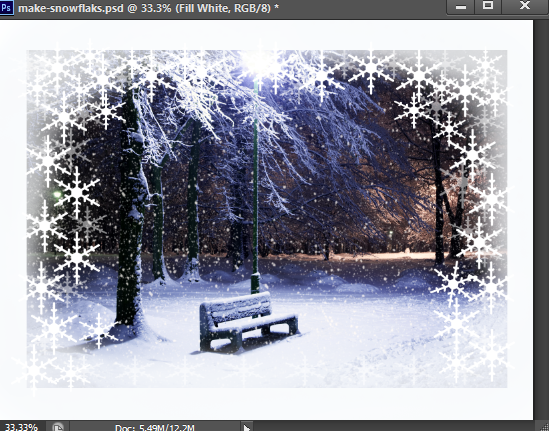
Image after Snowflakes

Custom Shape Photoshop Snowflake Tutorial for Beginners Step By Step

Step 1: Open Park Snow Falling Image from Computer

In our first step of this tutorial, open image from computer in Photoshop window. For this purpose go to File -> Open or press the command Ctrl + O.
The new open window will expose, here select the image from computer and click on Ok button.

Step 2: Create New Layer in Layer Panel

 After opening the original image now create a new layer. For this purpose, do click on the second right icon in below of layer panel. Enter the name of layer as “Fill White”. You will see the layer will be created in layer panel.

After that go to Edit -> Fill or press the command Shift + 5. A new fill window will open here pick up the white option click on Ok button. You will see the transparent sheet will converted white fill sheet.

Step 3: Use Rectangular Marquee Tool   

In our 3rd step use the rectangular Marquee Tool to select the area at the white sheet.
Pick up the Rectangular Marquee Tool from tool bar and make selection on the white sheet like below picture.

After selection of area press the key Delete from key board. You will see the selected area will be removed and the original background image will appear.

Step 4: Make Snowflakes Vectors around the Image

Now in step 4 make the snowflakes around the picture. For this purpose select the custom Shape Tool from the Tool Bar. After that go to shape box above the scree and select the Snowflak1 shape and drop it on the image.

Step 5: Make Soft Round Edges by Brush Tool   

 In our 5th and last step, make the soft round edges around the image. For this purpose select the Brush Tool from Tool Bar and pick up the brush style Soft Round Edges, Opacity 50% and Hardness 0 from above of window. Now paint this brush around the picture like below picture.  


Finally we have made snowflakes border around the picture using Photoshop. I hope you will have enjoyed and will do practical work at your end. If you couldn’t understand this amazing tutorial then don’t be worry. Here I have made a live video of this tutorial for you. So watch it and clear your concepts regarding to this tutorial.
Our final results can be seen in below picture.  
Custom Shape Photoshop Snowflake Tutorial for Beginners Step By Step

Ultimate Results
Conclusion
After discussion of above tutorial I conclude that it is so easy to make snowflakes around the image using Photoshop.
I followed 5 steps only edit the picture, so first of all opened a park snow falling image from computer. Created new layer and filled it, after that dropped the snowflake 1 shape. At the last made the Soft Round Edges by Brush Tool.
This was complete procedure, I’m sure you will have enjoyed it and will do practical work at your behalf.  

Incoming Searches


photoshop Snowflakes 
photoshop snowflakes brush
photoshop snowflakes shapes
photoshop snowflakes tutorial
photoshop add snowflakes
photoshop make snowflakes
photoshop custom shapes snowflakes
falling snowflakes photoshop
snowflake photoshop abr
snowflakes action photoshop
photoshop snowflake border
snowflakes background photoshop
photoshop snowflake custom shape
photoshop create snowflakes
photoshop cc snowflake brush
snowflakes photoshop download
photoshop snowflake effect
photoshop elements snowflake brush
photoshop snowflake filter
photoshop free snowflake brushes
snowflakes frame photoshop
snowflakes in photoshop
photoshop snowflake overlay
free photoshop snowflake overlays
snowflakes on photoshop
photoshop snowflake pattern
snowflakes paint brushes photoshop
snowflakes stamp photoshop
snowflakes to photoshop
snowflake photoshop brushes cs6
snowflakes brush in photoshop
snowflakes paint brush photoshop
real snowflakes brush photoshop
snowflake photoshop brush set
decorative snowflakes shapes photoshop


See Also


Share:

Color Grids Photoshop Tutorials Photo Effects for Beginners Step By Step


Howdy! we will learn, Color Grids Photoshop Tutorials Photo Effects for Beginners Step By Step.
Grids consist on little colorful square boxes, we will edit these at our picture. It is not difficult work, I have tried it many times that why I’m going to share this knowledge with you. Here you will be guided in such an easy way, you will understand it easily. I will use Grid properties and Marquee Tools to complete our work.
So be attentive and read this tutorial complete, every step is essential. If you would not understand this amazing tutorial then watch the video for better work.

Original Image

Image after Color Grid

 Color Grids Photoshop Tutorials Photo Effects for Beginners Step By Step 

Step 1: Open an Image from Computer for Color Grids

In our first step, open a girl image from computer. For this purpose go to File -> Open or key down the command Ctrl + O.
Suddenly an Open Window will expose here pick up your require picture from computer and do click on Open button.

Step 2: Make New Layer for Grid

In second step make a new layer, for this purpose go to File -> New from main menu or press the command Ctrl + N.
In new window will open, here put up the values as Name “Grid View”, Preset Custom,  Width 10 Inch, Height 8 Inch, Resolution 150 Pixels/ Inches, Color Mode RGB 8bit and Background Contents White.  

Recently when you click on Ok button a white blank sheet will appear in Photoshop window.

Step 3: Make Grid View on White Blank Sheet  

Now in 3rth step, make Grid view on the white document. For this purpose go to View -> Show – Grid from main menu or press the command Ctrl + ‘. You will see the square boxes will appear on the sheet like below picture.

After that go to Edit -> Preference -> Guide, Grid & Slice option from main menu. In new preference window put Gridline Every 1 Inches and Subdivision 1.


Now create new layer, so click on second right Icon in below of Layer Panel.
In below picture I have created Layer 1 in Layer Panel.


Step 4: Make Horizontal and Vertical lines by Marquee Tool

In our 4th step, make the horizontal and vertical lines. For this purpose select the Single Row Marquee Tool and do click on the horizontal line in the Grid. After one line hold the key Shift and drop other lines.
After the Select the Single Column Marquee Tool and do same for vertical lines in the Grid.

Step 5: Fill the Grid with Black and Deselect the Marquee

In 5th step fill out the Grid line with black color. For this purpose go to Edit -> Fill from main menu. A fill window will open, here select the option Black in Contents drop down menu and click on Ok button.
After that go to Select -> Deselect option from main menu. You will see the all selection will be removed and gird will see like bold black lines.

Step 6: Add a Girl Image into Grid Sheet

Now add a picture into grid sheet, for this purpose drag picture into gird tab with Move Tool.
Now move the picture under the Layer 1 in Layer Panel.


Step 7: Select Some Boxes in Grid by Magic Wand Tool

Now select some square boxes in the Grid, for this purpose select the Magic Wand Tool from Tool Bar and make section of boxes one by one by holding Shift key.
In below picture I have made selection of boxes.


Step 8: Make White Fill Layer in Layer Panel


After making selection of boxes now make the fill white layer. For this determination do click on second icon from right side in below of Layer Panel.
After that go Edit -> Fill from main menu or press the command Shift + F5. A fill window will open. Here pick up the White option from Contents drop down Menu and change the name as White Fill.

You will see the selected boxed will be turned into white.

Step 9: Change the Color and Hues of the Grid

In our 9th step, change the color, hues and saturation of the square boxes in the Grid. For this purpose, select the Layer 1 and pick up the Magic Wand Tool again and select a square box. After that click on Hue / Saturation from Adjustment Layer option in layer Panel.
In popup window check the Colorize option and adjust the Hue and Saturation values. In below picture I have changed the color of a box.

Do this step same to same for every box in the grid and change the colors. Here in below picture I have colorized the boxes.

Step 10: Lock Layer 1 and Do Fill White

In 10 step, make the grid line white of Layer 1, for this purpose do click on the Lock Icon in above of Layer Panel.
After that go to Edit -> Fill, and pick up the White item in Contents option. You will see the grid line will be converted into white.

This was our last step, finally we have leant to make colorful grid on a photo in Photoshop.
I hope you will understand it and will do piece of practice work at your end. If couldn’t understand this mind blowing tutorial then watch the video to complete you concepts according to this grid technique.
 Color Grids Photoshop Tutorials Photo Effects for Beginners Step By Step


Ultimate Results
Conclusion
After discussion of this tutorial I conclude that we can make colorful gird on a photo easily just using Photoshop.
We have followed 10 steps to complete this all procedure. First of all opened a girl image in Photoshop window. Made new document and created Grid view with fill Black line on it. Selected the square boxes around the picture and converted into White Fill.
After that changed Hue / Saturation and Color Balance of the grid boxes one by one. At the end gave the white Stroke to Layer 1. This was complete procedure which we have discussed above tutorial step by step.    

Incoming Searches 


photoshop tutorials photo effects
photoshop tutorials photo effects pdf
photoshop tutorials photo effects step by step
photoshop tutorials photo effects 2018
photoshop tutorials photo effects background
photoshop tutorials photo effects for beginners
photoshop tutorials photo effects cartoon
photoshop tutorials photo effects in tamil
photoshop tutorials photo effects online
photoshop tutorials photo effects black and white
photoshop tutorials photo effects cs5
photoshop tutorials photo effects easy
photoshop tutorials photo effects 2017
photoshop tutorials photo effects blur
adobe photoshop tutorials photo effects
photoshop tutorials manipulation amazing photo effects
adobe photoshop cs4 tutorials photo effects
adobe photoshop cs4 tutorials photo effects pdf
adobe photoshop cs3 tutorials photo effects pdf
adobe photoshop 7.0 tutorials photo effects
adobe photoshop cs6 photo effects tutorials pdf
photoshop tutorials photo effects step by step pdf
basic photoshop tutorials photo effects
photoshop cs6 tutorials photo effects for beginners
photoshop tutorials photo effects cs6
photoshop tutorial miniature photo effects cola
photoshop cs3 tutorials photo effects pdf
photoshop cs3 tutorials photo effects
photoshop cs6 tutorials photo effects pdf
photoshop cs4 tutorials photo effects pdf
photoshop cs5 tutorials photo effects pdf
photoshop cs2 tutorials photo effects
photoshop cs2 tutorials photo effects pdf
photoshop cs tutorials photo effects
photoshop cs4 tutorials photo effects
photoshop cs6 tutorials photo effects 3d
photoshop manipulation tutorials photo effects dream girl
photoshop tutorials dreamy photo effects
photoshop tutorial photo effects - digital painting effect
photoshop elements tutorials photo effects
photoshop photo editing effects tutorials
photoshop manipulation photo effects editing tutorials man on roof
photoshop tutorials photo effects free
photoshop tutorials for photo effects
fantasy photoshop manipulation tutorials photo effects
good photoshop tutorials photo effects
photoshop cs3 tutorials photo effects hd
photoshop tutorials in photo effects
photo effects in photoshop tutorials pdf
photo effects in photoshop cs6 tutorials
photoshop tutorials photo light effects
photoshop tutorials photo manipulation levitation effects
photoshop cc manipulation tutorials photo effects
photoshop tutorials photo manipulation effects
fantasy photoshop manipulation tutorials photo effects tutorials
new photoshop tutorials photo effects
photoshop tutorials on photo effects
photoshop cs6 tutorials create oil painting photo effects
photoshop 7 tutorials photo effects pdf
photoshop cc tutorials photo effects pdf
photoshop cs tutorials photo effects pdf
photoshop tutorials portrait photo effects
photoshop camera raw tutorials photo effects
photoshop romantic photo effects tutorials
simple photoshop tutorials photo effects
photoshop photo text effects tutorials
photoshop tutorials vintage photo effects
photoshop tutorials wedding photo effects
photoshop tutorials with photo effects
photoshop tutorial photo watercolor effect

See Also


Share:

How to Make Photo Frame Photoshop Tutorial Wood Design Template For Beginner Step By Step


Howdy! Photoshop Picture Frame Tutorial Wood Design Template For Beginner Step By Step .
Yes! In this tutorial we will learn how we can make wood photo frame around a picture in Photoshop.
Mostly people want to edit their photos in frames but they are helpless to do this. Don’t be worry here you will be guided completely.
I have made it many times in Photoshop and I want to share this knowledge with you. I will use Fill Wood Pattern and Emboss properties for this determination.     
So be attentive and don’t miss any step in this tutorial. I have learnt you with examples of image and video.

Original image

Image after Wood FrameHow to Make Photo Frame Photoshop Tutorial Wood Design Template For Beginner Step By Step 

Step 1: Open a Couple Image in Photoshop Window

In our first step of this tutorial, open a couple image from computer into Photoshop window.
So go to File -> Open or press the command Ctrl + O. in new open window pick up the require picture from computer and do click on Open button.

Step 2: Create New Wood Frame Layer in Layer Panel

In second step create a new layer, for this purpose do click on Create New Layer icon in below of Layer Panel and change the name of layer as “Wood Frame”.
In below picture I have create new wood frame Transparent Layer.


Step 3: Use Wood Custom Pattern

After creating new layer, now go to Edit -> Fill from main menu or press the command Shift + F5 from keyboard.
A Fill Dialog window will expose; here pick up the wood light brown pattern from drop down box and do click on Ok button.

You will see the Wood Frame Layer will be filled with Light Brown pattern.

Step 4: Use Rectangular Marquee Tool for Frame

After filling the wood pattern, now select the Rectangular Marquee Tool from Tool Bar. 
Press the command Ctrl + R for ruler the scales will appear at the screen. Now keep equal size of selection in every direction for frame. I have made the selection by Rectangular Marquee Tool just see it in below picture.

Now just press the command Delete from keyboard. You will see the selected area will be removed and the below image will appear in the frame.

Step 5: Manage Bevel Emboss and Stroke Properties for Frame

Before managing the Bevel Emboss properties. First go to Select -> Deselect from main menu or press the command Ctrl + D.
After that click on Wood Frame Layer in Layer Panel and go to Layer -> Layer Style -> Bevel & Emboss option.
A new Layer Style window will open, here adjust the Bevel & Emboss Properties as
Style: Inner Bevel
Technique: Chisel Soft
Depth: 100%
Direction: Up
Size: 4px
Soften: 1px

After that click on Stroke option in same window and adjust the values as
Size: 2px
Position: Outside
Blend Mode: Normal
Opacity: 100%
Color: #000000


You will see the frame will become more edgy and real look.
This was complete procedure to make wood frame on the picture in Photoshop. I hope you will have enjoyed it and will do practical work at your end. If you couldn’t understand this amazing tutorial then don’t be worry watch the video.
How to Make Photo Frame Photoshop Tutorial Wood Design Template For Beginner Step By Step

Ultimate Results
Conclusion
At the end I conclude that it is so easy to make Wood Photo Frame in Photoshop. We have learnt this all procedure just in 5 steps. Frist of all opened a couple image from computer. Created new layer and gave wood pattern from Edit -> Fill. After that selected the area by Rectangular Marquee Tool and Removed by Delete key. Managed the Bevel & Emboss and Stroke properties. This was all procedure, I hope you will have enjoyed it.   

Incoming Searches

 photo frame photoshop
photo frame photoshop template


photo frame photoshop tutorial

photo frame photoshop mockup

photo frame photoshop psd
photo frame photoshop cc
photo frame photoshop cs6

picture frame photoshop
picture frame photoshop template
picture frame photoshop tutorial
picture frame photoshop cc

photo frame design photoshop
photo frame images photoshop
photo frame adobe photoshop

frame photo album photoshop
add photo frame photoshop
photoshop frame a photo
adobe photoshop photo frame effects

add photo frame in photoshop elements
adding photo frame in photoshop

photo frame brushes photoshop cs6
picture frame brushes photoshop free
photo booth frame photoshop
photo border frame photoshop
blur photo frame photoshop
photo frame background for photoshop

photoshop photo frame - happy birthday
birthday photo frame for photoshop
best photo frame for photoshop
photo frame collage photoshop
photo frame in photoshop cs3
wood photo frame photoshop cs6
photo frame plugin for photoshop cs6
picture frame in photoshop cs6
christmas photo frame photoshop
circle photo frame photoshop
create photo frame photoshop
create a photo frame in photoshop cs6
photoshop christmas photo frame templates
how to make photo frame in photoshop cs3
photoshop create photo frame effect
couple photo frame for photoshop
how to add photo frame in photoshop cs6
how to add photo frame in photoshop cs5
photo frame design photoshop hd

wood photo frame design photoshop

cara buat frame photo dengan photoshop
cara membuat frame photo di photoshop
membuat frame photo di photoshop
photo frame effect photoshop
picture frame effect photoshop
glass photo frame effect photoshop
photo frame for photoshop
photo frame for photoshop design
photo frame for photoshop hd
photo frame filter photoshop
photo frame for photoshop 7
picture frame for photoshop
photo frame brushes photoshop free
picture frame filter photoshop
photo frame template for photoshop
photo frame plugin for photoshop
christmas photo frame for photoshop
photo frame png for photoshop
wedding photo frame for photoshop
picture frame graphics photoshop
grunge photo frame photoshop
how to make photo frame photoshop
how to frame photo photoshop
photo frame in photoshop
photo frame in photoshop cs6
photo frame ideas photoshop
picture frame in photoshop
picture frame in photoshop cc
photo frame size in photoshop
add photo frame in photoshop
create photo frame in photoshop
photo frame design in photoshop
photo frame effects in photoshop
old photo frame in photoshop
3d photo frame in photoshop
christmas photo frame in photoshop
insert photo frame photoshop
photoshop love photo frame
photo frame mask photoshop
free photo frame photoshop psd mockup
make photo frame photoshop
marriage photo frame photoshop
make round photo frame photoshop
photoshop multi photo frame
photo negative frame photoshop
photo frame on photoshop
old photo frame photoshop
create a photo frame on photoshop
how to add photo frame on photoshop
old school photo frame photoshop
photo frame polaroid photoshop
photoshop photo frame png
put photo in frame photoshop
place photo in frame photoshop
photo frame - psd template for photoshop
round photo frame photoshop
romantic photo frame for photoshop
photo frame style photoshop
photo frame shapes photoshop
photo frame size photoshop
picture frame shapes photoshop
picture frame styles photoshop
picture frame size photoshop
simple photo frame for photoshop
photo frame texture photoshop
free photo frame templates photoshop
vintage photo frame photoshop
photoshop photo frame vector
photo frame with photoshop
photo frame wallpaper photoshop
frame photo wedding photoshop
white photo frame photoshop
wooden photo frame photoshop
how to make photo frame with photoshop
photo frame templates psd
frames photo collage photoshop templates
free photo frame- psd template for photoshop

See Also

Share: